ECTtracker - First start. Getting Started
ECTtracker Setup Guide
In order to provide the proper image analysis level of the program, it's necessary to calibrate it and fill the Matrix of Samples. It's also necessary to change several parameters depending on the physical characteristics of the patient and performance of the computer. This is especially important during the first start of the application.
The initial setting procedure of ECTtracker and further work with the program include the following stages:
- Start of the program and user settings loading if necessary.
- Selection of the recognition structure.
- Image source setting and grab-form positioning (the user's manual will describe setting and use of ECTtracker in conjunction with ECTcamera).
- Automatic or manual calibration of ECTtracker (filling the Matrix of Samples).
- Setting of any receiving program, key codes and actions, as well as some additional parameters.
Start of the program and selection of the recognition structure
To start working with the program, the user needs to launch the eye-tracking application by opening the ECTtracker.exe file. In case the user needs to use a previously saved settings profile, then the user has to select the "Settings" – "Load Settings" menu item after starting the program, then choose the desired file in the dialog box of the program (see fig. 2). All the changes are applied after selection of the new configuration file.
After doing so (only if it’s necessary, because the type of the recognition structure is already predefined in the selected configuration file) the user has to select the recognition structure – for one eye only or for both eyes. Selection can be done through the "Samples" - "Choose Structure" menu items. Recognition structures differ in positions of key points, which are used during comparison of saved samples and images in the program window. Different structures are shown on figure 3. It is worth noting that different structures allow identifying the user’s selection not only by opening or closing eyes, but also using other actions. Such actions include eyebrow or lip movements or finger removing from the source image with bringing it back in a while; in other words – they include any clearly identifiable states of one object.
The main principle for the structure selection process is to put a maximum amount of key points above any fragment of the image with a maximum amount of visually distinguishable changes. Key points of the structure, which are located above a static area of the frame, increase the total load on the system and negatively affect the quality of tracking.
Selecting the image source and setting up the grab-form
Before tracking, the user has to predefine the image source in ECTtracker. If the program is used with a different application that acquires video from a web-camera or any other device, the user has to start that application first. If the program works with already recorded video, it's necessary to open the media player window first. This user's manual describes the joint work of ECTtracker and ECTcamera software. ECTcamera is an application intended for use with the web-camera of a laptop or any removable camera which is connected to a computer.
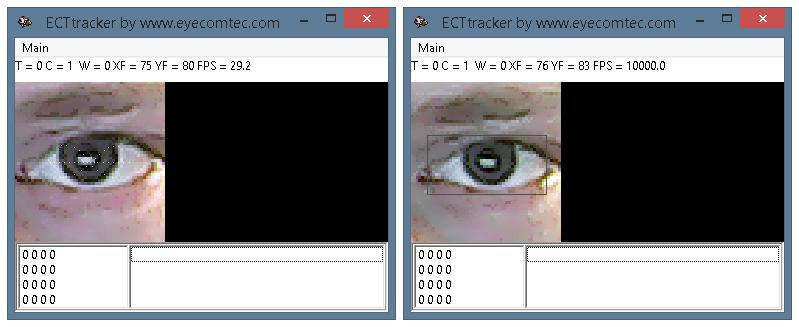
In order to provide the correct display of the video fragment from an ECTcamera window, it's required to place the target window (grab-form) above such window. During the start of ECTtracker, the user can see a semi-transparent rectangular area with a red border, which is intended for video capturing and transmitting it into the program. To set up video capturing, it's necessary to move the target window above the video window (see fig. 4). It’s worth noting that key points of structure in the video window of ECTtracker have to cover the maximum possible changeable area of the image.
If one needs to change the size of the grab form immediately, it can be done by right-clicking on it. The user has to select one of the actions in the menu that appears (see fig. 5).
The user can also left-click on the grab form in order to make it active, and use hot keys to change its size on the fly:
- Ctrl+Right – increase the grab form width
- Ctrl+Left – decrease the grab form width
- Ctrl+Down – increase the grab form height
- Ctrl+Up – decrease the grab form height
Each of the mentioned combinations will cause an immediate update of the grab form and the main window of the program.
After selection of the structure and correct positioning of the grab-form above the captured image, it's necessary to create or load the matrix of working samples for program operation and correct image recognition. If the user created such a Matrix of Samples before, it can be loaded:
- by using "Samples" – "Choose Matrix of Samples" menu items, if The Matrix of Samples was saved as one file.
- by using "Samples" – "Import Matrix of Samples" menu items, in case all samples were saved as separate files.
If there was no Matrix of Samples created, the user has to create it in manual mode or by using the automatic calibration feature.
Automatic calibration
Automatic calibration involves a script, which shows auxiliary images with various eye states to the user (both eyes open, only right eye open, only left eye open, both eyes closed). The user has to follow such images and close one or both eyes in accordance with the image on the screen. Different examples of such images are shown on figure 6.
Depending on the selected script, images are going to be shown on different parts of the screen. If one divides the screen into 9 different parts, each part will correspond with one auxiliary image (see fig. 7). The program is going to create a different sample in the Matrix for each position and eye state. This method is necessary to provide proper working of the program regardless of the part of screen the user is looking at.
Parameter 48 of the ECTtracker settings window allows the user to select a file with the auto-calibration script. Functionality of the script can be determined by the name of the file, because it contains a special symbol encoding. A number before the S letter shows the quantity of eye states, which are shown on the auto-calibration icon. A number before the P letter shows the quantity of different positions of the icon on the screen. A number before the M letter shows the quantity of rows in the Matrix of Samples.
1st example: if the Eye_2S5P2M.dat script is selected, the user will see icons with open and closed eyes. The icon is going to be shown in 5 different screen positions (in the center, in the upper left corner, in the upper right corner, in the lower left corner and in the lower right corner). The calibration process is going to fill 2 rows of the Matrix of Samples.
2nd example: if the Eye_4S5P4M.dat script is selected, the user will see icons with four possible states of eyes (both eyes open, right eye open, left eye open, both eyes closed). The icon is going to be shown in 5 different screen positions. The calibration process is going to fill 4 rows of the Matrix of Samples.
Thus, it's possible to select the type of auto-calibration that fits a specific user. E.g. if the patient can move only one eye, it can be useful to load a script that makes two types of samples - open eye and closed eye (in such case, the user has to locate the grab-form only above the area of the working eye and use the recognition structure for one eye). If the patient can blink with both eyes, then it can be useful to load a script for 4 states of eyes and the recognition structure for both eyes. The Eye_2S1P2M.dat script is used by default in ECTtracker.
To start the calibration process, it's necessary to select "Samples" – "Automatic calibration" menu items or press the F11 button. The user will see images with a countdown timer changing one by one. There is a sound at the end of each time period, after which the program saves the sample and goes to the next image. The calibration procedure allows the user to fill the Matrix of Samples in the fully automatic mode.
Some results of the auto-calibration feature may not look good, due to:
- significant image shift after head movement, if the patient retained motor activity;
- indistinct pictures caused by pupil movement, blinking, or head rotation;
- excessive shading of the images in case of poor lighting from the camera side.
In such cases, the user may erase the Matrix of Samples by using the "Samples"– "Reset Matrix of Samples" menu item, and can then re-calibrate, providing proper conditions for the process.
Manual calibration
The user can select samples for the Matrix of Samples in manual mode. By using this feature, the user can replace samples with bad quality received during auto-calibration, without re-calibration or selecting all samples in the manual mode.
The Matrix of Samples for ECTtracker can be filled in 2 ways:
- Create samples with the open eye of the user (usually 2 samples are enough when the program is set up correctly), then add them into the first row of the Matrix of Samples. Then create a sample with the closed eye of the user (one sample is more than enough) and add it into the second row of the Matrix of Samples. Then it's necessary to specify key codes and action codes (key stroke or release) by filling in parameters 111 and 112 of the settings window. The default value of parameter 111 (assigned to the open eye in the Matrix of Samples) is "32 2", which means "release space button". The default value of parameter 112 (assigned to the closed eye in the Matrix of Samples) is "32 1", which means "press space button". More information about key codes and other actions can be found in the "Settings and additional parameters of ECTtracker" section of this manual.
- Create a sample for closed eye and put it into the second row of the Matrix of Samples. Set the key code and the action code by filling in parameter 112 (by default, it has the "32 1" value, which means "press space button"). Specify the value for parameter 110 (by default, it has the "32 2" value, which means "release space button"). Parameter 110 defines the key code and the action code in cases where ECTtracker is not able to find at least one corresponding sample. Therefore, the program can work using only one sample with the open eye of the user! This feature simplifies the operation of ECTtracker and speeds up the initial setup process.
In order to add samples in the Matrix of Samples, it’s required to start the image capturing process in ECTtracker by using the "Start" menu item or the F2 key, followed by right-clicking on the image. The image will freeze on the current frame with a rectangular selection area centered on the click location (see fig. 8). Another right-click on the image inside the ECTtracker window will update the current frame. A left click will cancel the selection and restore the video capturing process.
 (Fig. 8. Selection of the image for the Matrix of Samples filling)
-
After selecting a proper sample, the user has to save it. In order to do so, the user has to click with any button on a desired cell of the Matrix of Samples. The sample is going to appear in the Matrix. In cases where the cell already contains a sample, it's going to be replaced without any additional confirmation. The appearance of the full Matrix of Samples is show on figure 9.
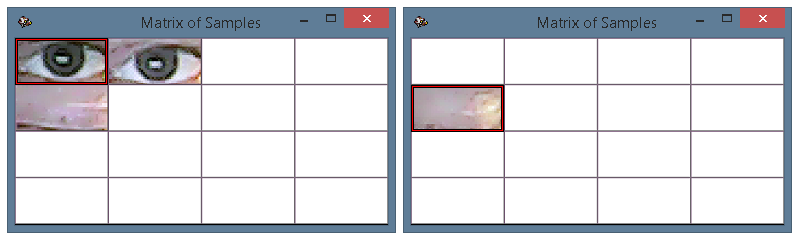 (Fig. 9. The full Matrix of Samples.
The right image - operation of the program with one sample and enabled parameter 110)
In order to provide more comfort during the filling of the Matrix of Samples, the user can switch the places of the samples. In order to do that, the user has to stop the program by pressing the "Stop" item of the menu. After that, it’s required to use the left or right mouse buttons and click on a sample that needs to be relocated. That sample will be highlighted with a blue border (see fig. 10). After that, the user has to click on the second sample and they will be switched.
Important information! Proper calibration and correct Matrix of Samples filling are required to improve image tracking quality. The overall accuracy of the current state of the user's eye tracking depends on the initial setting quality. After performing a proper calibration, the patient will be able to work with the matrix of symbols longer, making less mistakes and reducing stress.
Guidelines for the filling of the Matrix of Samples:
- it's necessary to click on the center of the pupil during the sample selection. This moment is really important, because all further tracking stabilization will be based on this point.
- the first row of the Matrix of Samples is created for samples with an open eye; the second is for samples with a closed eye. In any other case, it's necessary to correct the transmitted key codes (parameters 110-112).
- it's recommended to use not more than 2 samples of images with an open eye to provide proper operation of the program. One sample is more than enough for the closed eye of the user (see fig. 9).
- If it's possible, the patient has to look exactly at the camera. The ECTkeyboard virtual keyboard window has to be placed as close as possible to the web camera.
- the size of the main window of the ECTkeyboard and the distance between the patient and the display have to be selected in such a way that the pupil has as little movement as possible during working with the program. If the patient is located too far from the display, it's possible to change the font size without changing the size of elements in the Matrix.
- it's recommended to use only ECTcamera functionality to change the scale level or position of the image.
- the light source has to be placed in such a way that it doesn’t create an excessive shadow on the face of the patient. The user can dim any light that comes from things other than the display and place an additional source of light next to the display (e.g. LED-torch).
More detailed recommendations, full descriptions, diagrams and illustrations can be found in the "Tips and tricks" chapter.
Completing configuration
To complete the initial setting process of ECTtracker, the user also has to indicate the following parameters in the settings window of the program (it can be opened with the "Settings" – "Show Settings" menu items or by pressing the F3 hot key):
- Parameter 100 has to contain the following value: ECTkeyboard by www.eyecomtec.com, which is the name of the main window of the ECTkeyboard Symbol Matrix, which ECTtracker is going to use to transmit controlling key codes.
- Parameter 2 – the matching level of the sample and the analyzed image. It's recommended to decrease this value if the ECTtracker program is not able to find adequately corresponding samples during its operation. If the program finds two samples at the same time, then it's recommended to increase the value. The matching level of one row of the matrix has to be higher than the level of another row at any given time period (this can be clearly seen in the Stripes Diagram window). Depending on the camera, the lighting level and other parameters, an optimal value of wlim stays in the range from 18 to 35. The default value is 20.
- Parameter 5 – the maximum shift of the sample relative to the analyzed image. ECTtracker searches for matching images not only in the initial position of the image, but also in the area around it. This feature is required in order for the program to work correctly in cases of insignificant movements, inclination and rotation of head, when the the user retained only partial motor activity. The default value is 3.
- Parameter 4 – the frames per second rate of the image in the video window of ECTtracker. The higher this value is, the more often the image is updated. As a result, the quality of tracking increases as well as the requirements of the computing resources. The value of this parameter can stay in a range from 1 to 60, while the default value is 20.
- Parameters 24 and 25 – the width and the height of the target window (grab-form). The default values are 140 and 160 respectively. If the patient makes some insignificant movements, the analyzed image can go out of the grab-form view. It usually happens when the zoom level is significantly increased. It’s recommended to increase these parameters in order to keep the maximum possible amount of movements in the limits of the grab-form.
- Parameters 110-115 – key codes and action codes. These fields define key codes, which are sent to any receiving software when the image in the ECTtracker window corresponds with one of the saved samples. They also define performed actions (press key, release key, press and release key).
In order to improve the overall image recognition quality, the user has to define the priority levels of the color channels. Advanced users can select these priority levels manually by changing the value of parameter 15 of the settings windows of the program. The program also supports the automatic priority calculation mode. In order to use it, it’s required to select the "Settings" – "Set Channel Formula" items of the main menu.
When the user completes the selection of all desired parameters and the recognition structure, specification of the analyzing area of the image using the target window and creation of the Matrix of Samples, ECTtracker can be started. To start operation of the program, the user needs to select the "Start" item of the main menu or press the F2 button.
Comparison of the analyzed image and samples from the Matrix is performed for each frame, while coordinates of centers of samples exceeding the predetermined matching level (wlim parameter) are shown in the list of recognized samples in the main program window. Information about the sample with the maximum matching level is shown in the information field of ECTtracker.
The program determines the most appropriate sample for the current image. The corresponding sample is highlighted with the red color in the Matrix of Samples. Depending on the row of this sample, the program selects a predefined key code and action, which are then sent to any receiving software. In cases where none of the samples correspond with the current image, the program completes one of the actions predefined in parameter 9 of the settings window. If parameter 9 has the C value (search samples from the center part), ECTtracker moves the search point to the center of the analyzed image and resumes the search process in a while. If this parameter has the F value (search samples starting from last coordinates, where match was found), the program is going to search the sample within the limits of the last matching zone. The amount of frames to skip when no corresponding samples are found can be specified in parameter 6 of the settings window of the program.