ECTkeyboard - First start of ECTkeyboard. Getting started
First start of ECTkeyboard. Getting started
ECTkeyboard is ready to operate immediately after downloading. There’s no need to install the application. The user just has to run the executable file. Furthermore, the virtual keyboard can be launched from any portable storage device (a flash or SD card, an external hard drive, etc.).
The default settings allow the user to start operation of the application without performing any additional setting procedures. It’s only necessary to choose the proper working mode of the selector. In cases where the user needs to change various parameters of the program, it’s required to perform the following sequence of actions:
- Launch the ECTkeyboard app.
- Open the settings window of the program, by choosing Settings - Show Settings Window items of the main menu. The user can also press the corresponding hotkey - F3 (see fig. 2).
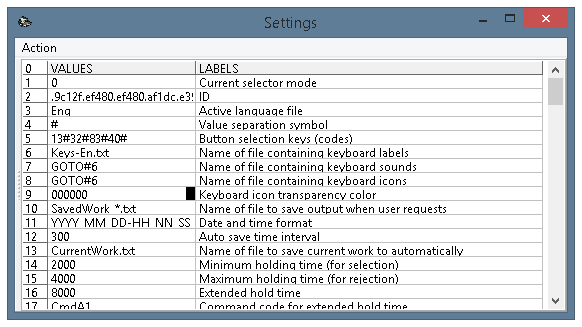 (Fig. 2. The settings window of ECTkeyboard)
- Choose the file with keyboard labels - parameter 6.
- Set the amount of key holding time required to select a symbol – parameter 14.
- Set the amount of key holding time required to cancel the selection of a symbol – parameter 15.
- Set required delay time for vertical and horizontal movements – parameters 18 and 19.
- Select horizontal (parameter 46) and vertical (parameter 47) numbers of buttons.
- Choose a font for symbols on the buttons and set its size and colors, as well as colors of surfaces and borders of buttons – parameters 57-80.
- Choose a font and its size for the text output window – parameters 106 and 107.
- If required, adjust the appearance of the progress bar (key selecting stripe) – parameters 131-149.
- Enable the current key thumbnail (parameter 161); adjust the position and appearance of the window – parameters 162-173.
- Enable the quick entry window (parameter 201) and adjust its appearance – parameters 202-217.
More detailed information about each parameter of the program can be found in the “Settings and additional parameters of ECTkeyboard” chapter of this manual.
After making all required changes, the user has to save all the settings and apply them to all program windows. In order to do so, the user has to select Settings - Set Current menu items. After doing so, the user can proceed to the program operation.
In order to work with ECTkeyboard, it’s required to select one of available selector operation modes. Such selection can be done through the Start submenu. The current version of the program supports the following modes:
- Manual selection (modes 0, 0A, 0B);
- Coordinate scanning (modes 1, 1B);
- Symbol-by-symbol scanning (modes 2, 2B);
- Half selection (mode 3);
- Gaze control of the cursor buttons (mode 4);
- Gaze control of the mouse cursor (mode 5).
The 5th and 6th options are intended to work in conjunction with an external eye-tracking device, i.e. a device that tracks the eye movements of the user and identifies the direction of the user’s sight. More information about the gaze control feature can be found in the “Main menu and functionality of ECTkeyboard” chapter of this manual.
After choosing the required selector mode, the user can proceed to the text typing process. In case the text output window is not shown, it’s necessary to press the F5 hot key or select the Show Output Window item in the main menu of the program.